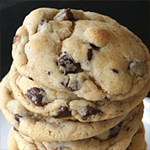
Oatmeal Raisin Cookies

Chewy raisins, warm cinnamon, earthy oats,
and all the goodness of the perfect chocolate chip cookie make this
oatmeal cookie great!
|
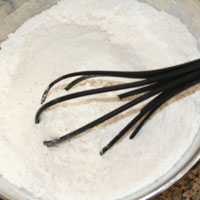
In a small bowl gently mix the flour, oats, salt, and baking soda until
the ingredients are evenly distributed. Set aside. |
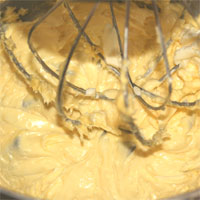
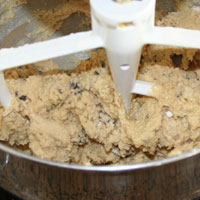
Using the wire whisk attachment of a stand
mixer, cream the butter and shortening on high until light and fluffy,
1-3
minutes.
|
Add both sugars and beat on high 1-2 minutes. Add eggs and vanilla. Beat until fully incorporated.
|
2 1/3 c (12 oz) flour
1 c (4.5 oz) old-fashioned oats
1 t baking soda
1 t salt
2 t cinnamon
1/2 c (4 oz) unsalted butter at room temperature
1/2 c (4 oz) Crisco (plain or butter flavored, I prefer plain)
Mixing the flour allows the final dough to have an even
distribution of ingredients without over-mixing it.
Beating the
butter and shortening gives the dough a better rise in the oven, making
the cookies lighter. Butter is good for taste and shortening is good to
make the cookie softer. |
|
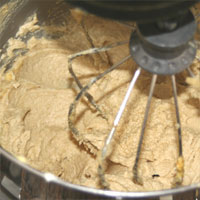
Switch to the paddle attachment.
Add the raisins and mix gently.
|
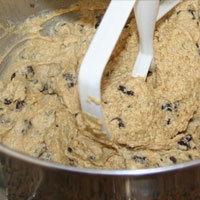
Add the flour mixture and mix until just incorporated. Do not overmix! |
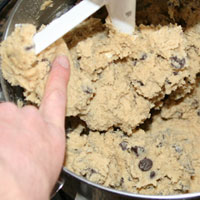
Touch test the dough. It should feel slightly sticky, but not much should stick to your finger. If it is very sticky add flour 2T (.5 oz) at a time. |
1 c (6.5 oz) light brown sugar
1 c minus 2 T (6.5 oz) white sugar
2 large eggs
1 1/2 t vanilla
1 1/2 c (10 oz) raisins
Adding
the raisins before adding the flour evenly distributes them without
overmixing the final dough. Do not over-mix or it will discolor
the dough.
The flour to be just incorporated, is the point when you no longer see white spots
of flour. Do not overmix! Over-mixing will ruin the
cookies. They will bake flatter and look greasy. See the
problem section for a picture of a very over-mixed cookie. |
|
|
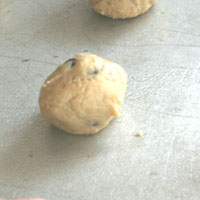
Using your hands, roll the dough into balls 1.5 inches tall
(1.5 oz). (For bigger cookies
click to
see instructions). Place on an ungreased cookie sheet 3 inches apart.
|
Cover and refrigerate 30 minutes or until firm.
You can hold the dough up to two days in the refrigerator or up to 6
months in the freezer.
As soon as you put the dough into the refrigerator, position the oven
rack to the second highest setting. Preheat the oven to 375.
|
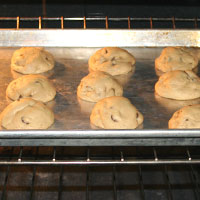
Remove the dough from the refrigerator and bake
8-10 minutes. They are ready to come out of the oven when they
are domed and puffy, show a few signs of browning and look a bit
underdone.
|
You will be able to when you
shape them if you have the fat/flour ratio right.
too little flour-
it will stick to your hands when shaping it, forms a messy looking ball
just right- won't stick to your hands, but just barely,
forms a smooth ball
too much flour- dough has to be
forced into a ball, crumbly dough, rough looking ball
The same
problems occur when over-handling the dough as over-mixing it.
They will bake flat and look greasy.
Handle the dough as little as possible while still shaping them
properly.
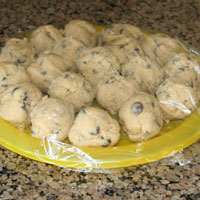
To freeze, place the dough balls on a plate side
by side, cover and freeze at least an hour. You can then bag them
and they won't be stuck together when you take them out. |
|
Leave the cookies on the cookie sheet for 2
minutes. Remove them to a cooling rack so they will cool evenly. Wait ten minutes, then serve!
|
|
|
It takes most ovens much
longer to preheat than when it beeps to tell you it's ready. An
oven thermometer is very helpful. When my oven beeps, it’s usually 50-100 degrees too low. It will ruin
the cookies to bake them at the incorrect temperature. My oven is also
calibrated incorrectly. I have to turn it to 385 degrees for it to actually be 375 degrees.
Determining when they are
done:
underdone- the are tall, shiny in
the middle, pale in color, fall apart when transfered,
fall through on the cooling rack
perfect- domed,
puffy, show a few signs of browning, look a bit underdone but are
not shiny on the top, hold together during transfer
overdone- flat, many brown spots, may break when
transfering, hard and crispy when cooled
If they cook faster
than 8 minutes the oven is too hot or the cookies are too small. If they take longer than 10 minutes the oven is too cool or the cookies are too big.
It is important to wait 2 minutes before transferring them.
They continue to cook from the heat of the sheet without being
over-baked in the oven. Also, they will hold together better
and be less likely to fall in the middle if you wait.
|
| See Perfect Chocolate Chip Cookies for more problems and pictures.
|
|
Oatmeal Raisin Cookies
2 1/3 c (12 oz) flour
1 c (4.5 oz) old-fashioned
oats
1 t baking soda
1 t salt
1/2 c (4 oz) unsalted butter at room temperature
1/2 c (4 oz) Crisco (plain or butter flavored, I prefer plain)
1 c (6.5 oz) light brown sugar
1 c minus 2 T (6.5 oz) white sugar
2 large eggs
1 1/2 t vanilla
1 1/2 c (10 oz) raisins
1. In a small bowl mix the flour,
oats, salt, and baking soda until the ingredients are
(1)evenly distributed. Set aside.
2. Using a wire whisk attachment of a stand mixer, (2)cream
the butter and shortening on high until light and fluffy 1-3 minutes.
3. Add both sugars and beat
on high 1-2 minutes. Add eggs and vanilla. Beat until fully incorporated.
4. Switch to a paddle attachment.
(3)Add the raisins and mix gently.
5. Add the flour mixture and mix until
(4)just incorporated.
6. Touch test the dough. It should feel slightly sticky, but not much should stick to your finger. If it is very sticky add flour 2T (.5 oz) at a time.
If it is firm or dry, you have added too much flour and I don’t know
a good way to reverse this.
7. Using your (6)hands, roll the dough into balls 1.5 inches tall (for bigger cookies see instructions below). Place on an ungreased cookie sheet 3 inches apart.
8. Cover and refrigerate 30 minutes or until firm. You can hold the dough up to two days in the refrigerator or up to 6 months in the
(7)freezer.
9. (8)15-20 minutes before baking,
position the oven rack to the second highest setting. Preheat the
oven to 375.
10. Remove the dough from the refrigerator and bake
(9)8-10 minutes. They are ready to come out of the oven when
they are domed and puffy, show few signs of browning and look a bit
underdone.
11. Leave the cookies on the cookie sheet for
(10)2 minutes. Remove them to a cooling rack so they will cool evenly. Wait ten minutes, then serve!
Notes
1. Mixing the flour allows the final
dough to have an even distribution of ingredients without
over-mixing it.
2. Beating the
butter and shortening gives the dough a better rise in the oven,
making the cookies lighter. Butter is good for taste and
shortening is good to make the cookie softer.
3.
Adding the raisins before adding the flour evenly distributes them
without overmixing the final dough. Do not over-mix or it
will discolor the dough.
4.
Just incorporated
is the point when you no longer see white spots of flour. Do
not overmix! Over-mixing will ruin the
cookies. They will bake flatter and look greasy. See the
problem section for a picture of a very over-mixed cookie.
5. You will be able to tell at this
point if you have the fat/flour ratio right.
not enough flour-
it will stick to your hands when shaping it, forms a messy
looking ball
just right- won't stick to your hands,
but just barely, forms a smooth ball
too much flour-
dough has to be forced into a ball, crumbly dough, rough looking
ball
6. The same problems occur
when over-handling the dough as over-mixing it. They will
bake flat and look greasy.
Handle the dough as little as possible while still shaping them
properly.
7. To freeze, place
the dough balls on a plate or baking sheet side by side cover and freeze at
least an hour. You can then bag them and they won’t be
stuck together when you take them out.
8.
It takes most ovens much longer to preheat than when the oven
tells you it’s ready. I have an oven thermometer which is
very helpful. When my oven beeps telling me it’s ready,
it’s usually 50-100 degrees too low. It will ruin your
cookies to bake them at the incorrect temperature. My oven is also calibrated incorrectly. I have to turn it to
385 degrees for it to actually be 375 degrees.
9. Determining when they are done:
underdone- the are tall, shiny in the middle, pale in
color, fall apart when transfered from the cookie sheet, fall through on
the cooling rack
perfect- domed, puffy, show a few
signs of browning, look a bit underdone but are not shiny on the
top, hold together during transfer
overdone- flat,
many brown spots, may break when transfering, hard and crispy
when cooled
If they cook faster than 8 minutes the oven is too hot or the cookies are too small. If they take longer than 10 minutes the oven is too cool or the cookies are too big.
10. It is important to wait this 2
minutes. They continue to cook from the heat of the sheet
without being over-cooked in the oven. Also, they will
hold together better and be less likely to fall in the middle if
you wait.
|
|
|
Recipes
Desserts

Occasions
Appetizers

Produce
|
