|
||||||||||||||||||||
These take a long time to make, but are so fun! You can
bake them the same day you make them, or refrigerate the shaped breadsticks
overnight. |
||
|
|
||
 |
 |
 |
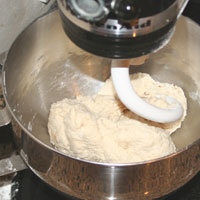
Add all ingredients and knead on low 10-12 minutes. The dough should be tacky and very pliable. If it is dry add water 1-2 T at a time. If it is too sticky add flour 1-2 T at a time. |
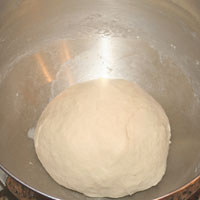
Form into a ball and cover with plastic wrap. Let rise 1 1/2 hours at room temperature. |
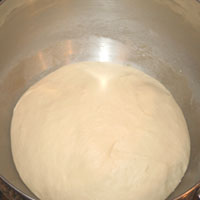
It should double in size.
|
1 c + 2 T (9 oz) cool water 1/2 c (4 oz) plain yogurt 2 T olive oil 1 T instant yeast 3 1/4 - 3 1/2 c (16.8 oz) all purpose flour 2 t (.2 oz) gluten 1 T brown sugar 1 ½ t salt Buttermilk powder is great because you can keep it on hand without it spoiling like fresh buttermilk. I wouldn't use it as a substitute in most recipes, but for bread doughs, it works great. To use in this recipe: 3 T (1 oz) buttermilk powder and 1 c minus 2 T (7 oz) water. |
||
|
|
||
Spray two jellyroll pans with cooking spray and set aside. |
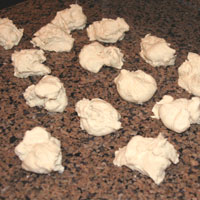
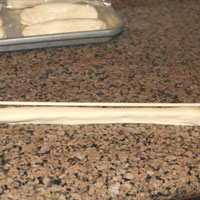
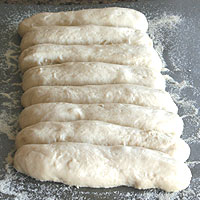
Break dough into 16 equal pieces (2 oz each). You will have about 1 oz extra. Just discard this. |
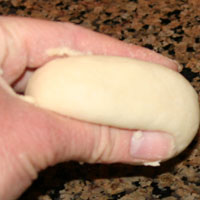
Form into a long roll shape by pushing dough into the bottom with your thumbs and pinching the bottom. This forms a tight skin on top. |
|
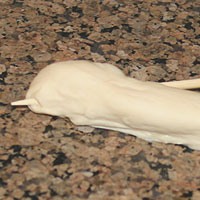
Pick up each piece and gently stretch. Don't stretch it farther than it's ready or it will be uneven or tear. Let it rest longer if it resists stretching.
|
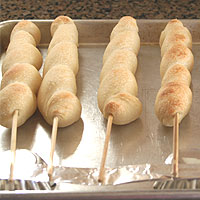
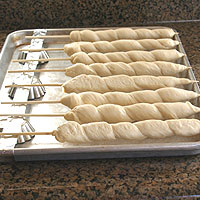
Place formed dough next to a skewer. It should be the length of the skewer. |
An autolyse is when the dough rests which relaxes the gluten. This allows it to stretch easily and evenly. |
||
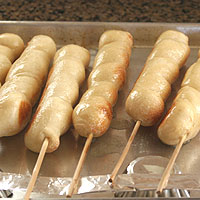
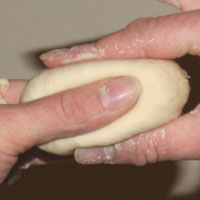
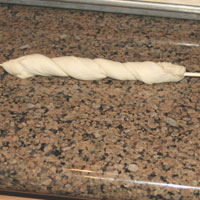
Take the dough and wrap the top 1/8" from the tip. Pinch the dough to seal. Turn the skewer while wrapping the dough around it. The dough should extend about 2/3 the length of the skewer. |
Pinch at the end to seal. Lay flat on prepared pan. |
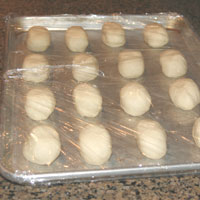
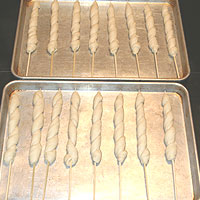
Place 8 pieces per sheet. You don't want to overcrowd them, they will stick together. Cover with plastic wrap and refrigerate a few hours or overnight. If you would like to bake them sooner, continue to the next step and let them rise on the supports. |
The tip of the skewer needs to be exposed so it can be suspended on the baking sheet later on without the dough sticking to it. |
||
|
|
||
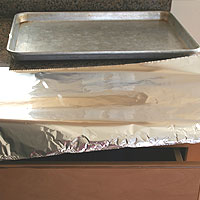
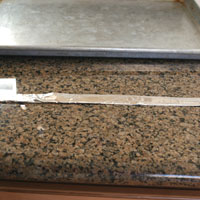
Set two jellyroll pans on the work surface. Measure a piece of aluminum foil about 6 inches longer than the length of the pan. |
Fold in half lengthwise and keep folding in half until about 1/2 inch wide. |

Wrap lengthwise around pan about 1 inch from the side. Place a few supports under the foil. I used mini tart tins. Canning jar lid rims work well also. Repeat the foil process for the second pan. |
I have made these suspended in a 9x13 pan and they didn't work very well. Much of the dough drooped to the bottom of the pan. |
||
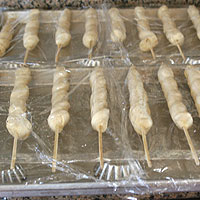
Remove the dough from the refrigerator 45-60 minutes prior to baking. Immediately remove each piece from the refrigerated sheet onto the prepared sheet. Place the tip of the skewer on the rim of the pan and the end on the foil. |
Cover with plastic wrap and proof 45-60 minutes. Position the top rack of the oven on the second highest setting. Preheat the oven to 450 at least 30 minutes before baking. |
|
The amount of time to proof the dough will vary greatly depending on the temperature. In the winter, it takes a lot longer than in the hot kitchen in the summer. To speed rising in a cold house, place a hot pad under it. |
||
 |
|
 |
Bake at 450 8-10 minutes until tops are starting to brown. Most ovens will only fit one jellyroll pan per rack, so bake one sheet at a time. |
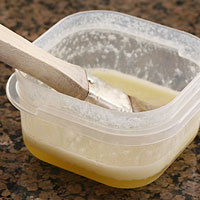
While they are baking melt butter and set aside. Measure parmesan and set aside. Measure cinnamon and sugar and set aside. |
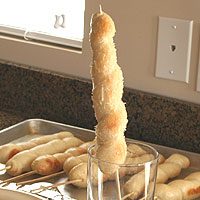
When the breadsticks are done brush, generously butter them using a pastry brush and set on the hot pan. Put the second batch in the oven to bake then proceed to top the hot buttered breadsticks.
|
1/4 c melted butter |
||
|
 |
 |
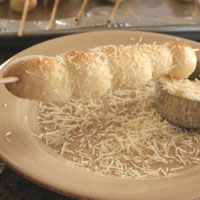
On a seperate plate generously coat with parmesan. It is best to use a seperate plate so you can collect the parmesan that has fallen off the breadstick and re-use it. If it falls onto the hot buttery pan it will be difficult to re-use and not look as good. |
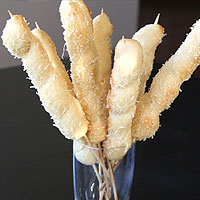
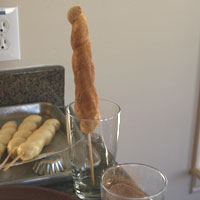
Place upright in glass and repeat with the remaining breadsticks. |
Serve hot! |
1/2 c fresh parmesan shredded (if you're making all of them parmesan, double the amount) |
||
|
 |
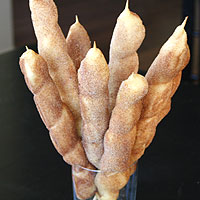 |
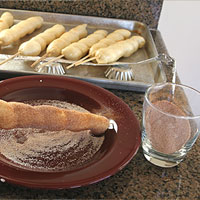
On a seperate plate generoulsy coat with cinnamon and sugar. It is best to use a seperate plate so you can collect the cinnamon and sugar that has fallen off the breadstick and re-use it. If it falls onto the hot buttery pan it will be difficult to re-use and not look as good. |
Place upright in glass and repeat with the remaining breadsticks. |
Serve hot! |
1/4 sugar 1 1/2 t cinnamon (if you're making all of them cinammon and sugar, double the amount)
Stone Baked
|
||
|
|
|
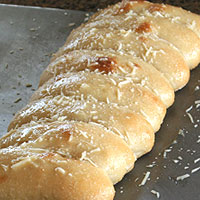
Follow the instructions for dough and shaping excluding the final stretch. They should be about 6 inches long. Place them loosely side by side. Cover with plastic wrap and refrigerate overnight. An hour before baking, remove from the refrigerator. Immediately sprinkle a peel or inverted cookie sheet with cornmeal, semolina, or flour. Transfer the breadsticks to this and gently shake to make sure they aren't sticking. Cover loosely with plastic wrap and proof 60 minutes. Prepare the oven by placing the top rack on the second to highest setting. Preheat the oven to 450 at least 30 minutes before baking. |
Slide onto the hot stone and bake 6-8 minutes until golden brown. While they are baking, melt butter and add garlic powder. Immediately after breadsticks come out, brush them generously with butter/garlic mixture. Sprinkle desired amount of parmesan on top. Transfer to a cloth-lined basket or serving tray so the bottoms stay crisp. Serve hot. |
|
1/4 c cornmeal of semolina 2 T melted butter 1/8 t garlic powder 1-2 T fresh shredded parmesan |
||
Classic |
||
|
|
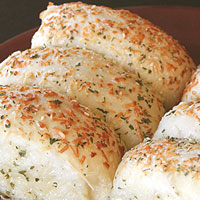 |
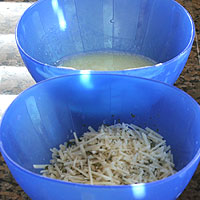
Follow the instructions for dough and the first step of shaping. They should be about 3 inches long, 1 inch tall, and 1 inch thick. |
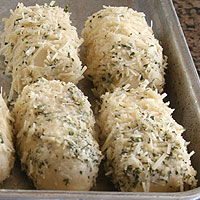
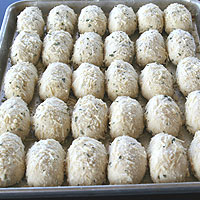
Roll each shaped in the butter and coat completely. Roll in parmesan/parsley and coat completely. Place on jellyroll pan 6 across. They will be almost touching. Cover with plastic wrap and refrigerate overnight. Remove 1 hour prior to baking. To bake sooner, cover and let rise 45-60 minutes until doubled in size. |
Preheat oven to 350 15-30 minutes before baking. Bake 15 minutes until lighlty browned on top. Brush with melted butter if desired. Transfer to a cloth-lined basket or serving tray so the bottoms stay crisp. Serve hot. |
1/4 c butter very soft but not melted 1 c fresh parmesan shredded or 1/2 sugar 1 T cinnamon |
||
For a full jellyroll pan, double the recipe.
|
|
|
Problems Twisty Breadstick Problems Flat breadsticks - Baking them flat on the sheet is not worth the work it takes to shape them around the skewer. The bottom bakes flat and they don't look very good served as shown in the glass. If you don't plan on suspending them, follow the instructions for stone baked or flavored breadsticks. |
||
Twisty Breadsticks 2. Pick up each piece and gently stretch. Don't stretch it farther than it's ready or it will be uneven or tear. Let it rest longer if it resists stretching. Place formed dough next to a skewer. It should be the length of the skewer. Take the dough and wrap the top 1/8" from the (2)tip. Pinch the dough to seal. Turn the skewer while wrapping the dough around it. The dough should extend about 2/3 the length of the skewer. Pinch at the end to seal. Lay (3)flat on prepared pan. Place 8 pieces per sheet. You don't want to overcrowd them, they will stick together. 3. Cover with plastic wrap and refrigerate a few hours or overnight. If you would like to bake them sooner, continue to the next step and let them rise on the supports. Proofing 2. Remove the dough from the refrigerator 45-60 minutes prior to baking. Immediately remove each piece from the refrigerated sheet onto the prepared sheet. Place the tip of the skewer on the rim of the pan and the end on the foil. Cover with plastic wrap and proof 45-60
(5)minutes. Position the top rack of the oven on the second highest setting. Stone Baked Breadsticks 2. Immediately sprinkle a peel or inverted cookie sheet with cornmeal, semolina, or flour. Transfer the breadsticks to this and gently shake to make sure they aren't sticking. Cover loosely with plastic wrap and proof 60 minutes. Prepare the oven by placing the top rack on the second to highest setting. Preheat the oven to 450 at least 30 minutes before baking. Flavored and Baked 3. Bake 15 minutes until lighlty browned on top. Brush with melted butter if desired. Transfer to a cloth-lined basket or serving tray so the bottoms stay crisp. Serve hot. Notes 2. Lay the breadsticks flat on the cookie sheet. They will be suspended during the proof and while baking. If you bake them sooner, let them proof on the supports. 3. The tip of the skewer needs to be exposed to it can be suspended on the baking sheet later on without the dough sticking to it. 4. I have made these suspended in a 9x13 pan and they didn't work very well. Much of the dough drooped to the bottom of the pan. 5. The amount of time to proof the dough will vary greatly depending on the temperature. In the winter, it takes a lot longer than in the hot kitchen in the summer. To speed rising in a cold house, place a hot pad under it. |
||

Recipes