|
French Bread II
I've had my french bread recipe posted since I started
the website. I learned a new method which I have had more consistent
results with. The recipe is the same, just split up into a poolish and
a final dough. The rising times are much different and it takes more
time the day before than the previous recipe. The dough is more
elastic and less likely to deflate when scoring it. The french bread
pans solve the transfering and possible problems of the dough deflating.
The results are even better than before!
|
|
|
|
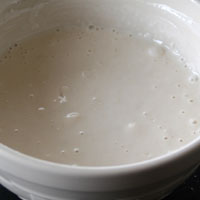
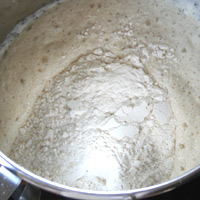
In the bowl of an electric
mixer add flour, water and yeast. Using the paddle attachment, mix on
medium speed 2 minutes.
|
Cover and ferment 4 hours. |
|
Poolish
1 c (5
oz) all-purpose flour
1 c (8 oz) cool water
1 t instant yeast
|
 |
 |
 |
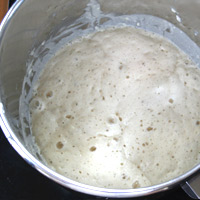
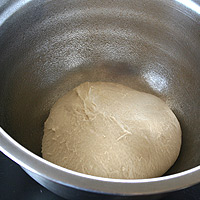
| To the poolish add the
remaining ingredients. Knead 5 minutes then test touch the dough.
It should feel tacky. Adjust the flour or water as necessary.
Knead another 5 minutes and test the dough using a window pane test.
Knead an additional 3-5 minutes if it tears easily. |
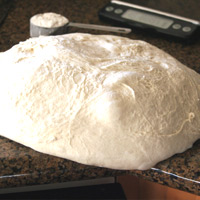
Remove dough and form into a
ball. Spray bowl with cooking spray. Place the dough top side
down in the bowl, then turn right side up so it is all lightly coated with
cooking spray. |
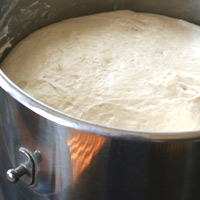
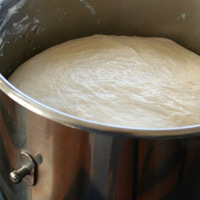
Cover and rise 3 hours.
|
poolish (use it all)
3
3/4 c (1 lb 2.75 oz) all purpose flour
2 t (.2 oz) gluten
2 t salt (.5 oz)
1/2 t diastatic malt powder or brown sugar
1 c (8 oz)
cold water
The flour and water proportions are critical
for this bread to turn out correctly.
Too little flour - If there is not enough flour, the bread will not be able to hold it's shape. It will bake a litle flat, or may deflate completely and be very flat. It will also be a little gummy and sticky.
Too much flour - Too much flour of course makes a dry loaf of bread. If you're going to err in this recipe, err on the side of too much flour. The loaves will still look good and taste better than a flat sticky loaf.
Adding water may take some kneading by hand until it's incorporated or it may splash out of the bowl. It's always eaiser to add more flour than it is to add more water.
Stretch the dough betweeen your fingers, if it tears before a thin window is formed the gluten is not developed. If it stretches to form a thin window, it is ready.
|
|
|
 |
 |
| Punch dough down and reform
into a ball. Respray the bowl and lightly coat the dough with cooking
spray again. |
Cover and rise 2 hours.
|
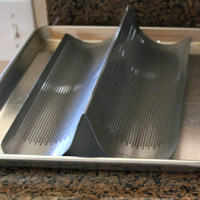
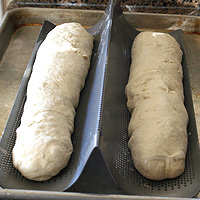
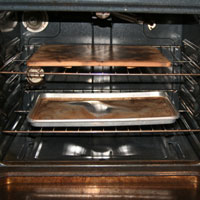
Place a french bread pan on a
sheet pan. |
|
 |
 |
 |
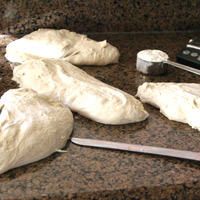
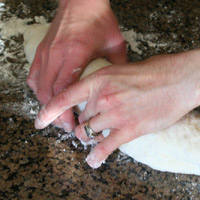
| Gently remove dough from bowl
and place on a work surface. Handle it carefully so the air pockets won't get pushed out.
|
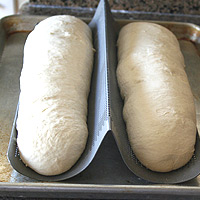
Divide the dough in half. (In
the picture I'm making a double recipe). They should weigh 1 lb 4 oz
each. |
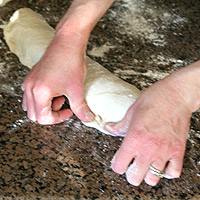
Lengthwise, fold the bottom
third up and the top third down overlapping the bottom third. Using your
thumbs press the new bottom fold down sealing it with the rest of the dough. |
If air pockets rise to the surface while forming the loaves, gently pop them. If you don't they can get very large during the refrigeration and when you tranfer them, they may pop and deflate the dough completely. If it doesn't pop it still may ruin the loaf by expanding in the oven leaving the loaf with huge air pockets just under the crust.
Refrigerating this dough for at least 8 hours is necessary to the structure of both the crust and interior of the bread. See problems for more information on this.
|
 |
 |
 |
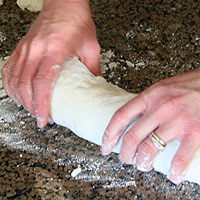
Wrap the ends in and seal them to
the bottom as well.
|
Roll the dough so the seam is on the
bottom and gently rock the dough back and forth starting from the middle
stretching it to the desired length. Pinch the seam while doing this to have
a tight and even skin. If there are large air pockets that rise to the
surface gently pop them.
|
Place dough on french bread pan. There is no
need to flour or spray the pan. There should be 2 or so inches of
space on both ends of the pan. Repeat the above process with the
second piece. |
|
 |
 |
 |
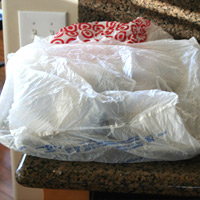
| Cover the cookie sheet with two plastic grocery bags. Refrigerate overnight. |
Remove from the refrigerator 1 hour prior to
baking. Keep it covered. 30 minutes prior to baking, position one oven
rack to the second highest setting and place a baking stone on it.
Position another rack to the lowest setting and place a steam pan on it.
Heat to 500 degrees.
|
15 minutes prior to baking remove the plastic bags.
Place 2 c hot water next to the oven. Gently touch the dough to see if
it is ready. |
It will take most ovens 20-30 minutes before it can reach 500 degrees. It will register much sooner than this, but it often isn't ready. When my oven first registers at 500 it is actually at 300. Ten to twenty minutes later it will actually be at 500. If you put the bread in when the temperature is really at 300, it will ruin the loaves. The color, structure, and crust will be off. An oven thermometer is very helpful for this.
A baking or pizza stone is necessary for this bread to turn
out properly. A stone provides even heat throughout the loaf.
This prevents it from burning the bottom and cooking the top unevenly.
I use a jellyroll pan for a steam pan. It does warp it, but that's all I use it for. I like the large hot surface area it gives the water. It produces a lot of steam very quickly and the rest slowly througout the baking period.
When the dough is ready, it
should feel very soft to the touch, but not easy to deflate. Don't
let it rise so much that it will deflate when scored. After making
this a few times you'll get used to how it should feel.
|
 |
 |
 |
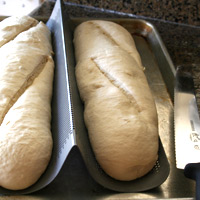
| With a serrated knife or bread lame gently score
the top of each loaf 2-3 times. Immediately place french bread pan
onto the hot stone in the oven. Pour the 2 c hot water into the steam
pan. Close the oven and set a timer for three minutes. After the
3 minutes lower oven heat to 450. Bake another 12 minutes. Turn
the pan 180 degrees and bake another 10 minutes. |
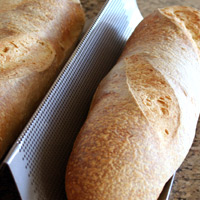
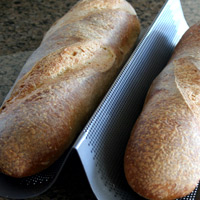
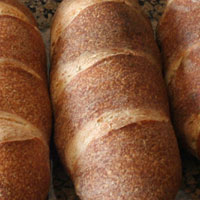
The loaves should be a deep golden brown.
Bake an additional 3-5 minutes if it can handle it. You can also turn
the oven off and let it sit 10 minutes on the stone, if it doesn't look
ready. |
Remove from oven and from french bread pan.
Place on a cooling rack. The bread will continue to bake while it
sits. Wait two hours before slicing and serving the bread. If you cut
into it before it cools it will become gummy and the taste won't be quite
right. Eat the bread the same day it is baked. If you don't you can
freeze it. See notes below the recipe for slicing and storing tips. |
I don't know how many times I haven't turned the timer on for the three minutes thinking I would remember. Before I know it they have been baking at 500 for 10 minutes. I have ruined several loaves this way.
Breads should be baked as long as they can be without burning. It makes the crust crisper and the inside drier as opposed to gummy.
|
Problems
 |
1.
Undermixed - dough: lumpy, fermentation: few air pockets, crust: pale, taste: dense, sticky, and chewy. This was the worst taste of all of them
2. Overmixed - dough: elastic and stringy, fermentation: many air pockets, crust: great, taste: dense and mushy.
3. Too much gluten - dough: great, fermentation: good air pockets, crust: great, taste: good
4. All all-purpose flour - dough: not developed enough, fermentation: good air pockets, crust: great, taste: a bit dense and a little crumbly
5. Perfect - dough: great, fermentation good air pockets, crust: great, taste: airy, elastic, not gummy, not dry, perfect!.
6. Oven too hot - dough and fermentation: same as above, crust: overdone, taste: gummy
7. Oven too cool - dough and fermentation same as above, crust: thin, soft, and pale
8. Made same day - dough and fermentation same as above, crust: crisp but thin, taste: gummy and strange. This loaf baked really strange, it opened too much in some areas and not enough in others. I was surprised to find how much the overnight refrigeration affected the bread.
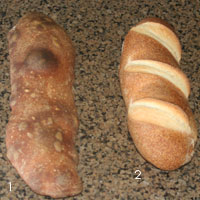
Flour
1. Not enough flour - dough: sticky, fermentation: many air pockets, crust: overbrown too quickly, flat, sticky.
2. Too much flour - dough: stiff and dry, fermentation: fair air pockets, crust: didn't open fully, taste: dense.
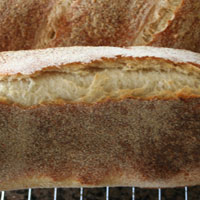
It is a good indicator that you have too much flour if the score marks stick up high like in loaf #2. The score marks in the picture above this one are almost even with the loaf which is how they should be.
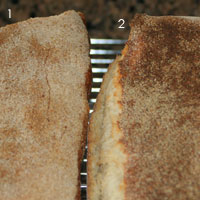 
Stone vs. Pan
I asked my husband what he thought the difference would be between baking this bread on a hot stone versus a pan that was not preheated. He thought the bottom of the loaf on the stone would bake more quickly, and that the top wouldn't be as done. This would be the logical thing, but just the opposite was true.
Loaf #1 - Stone baked: baked evenly.
Loaf #2 -
Pan baked: the loaf split open near the bottom, the bottom burnt, the top was underdone, and the loaf didn't open well (the score marks were not open).
|
French Bread II
makes 2 loaves
Poolish
1 c (5 oz) all-purpose
flour
1 c (8 oz) cool water
1 t instant yeast
Final
Dough
poolish (use it all)
3 3/4 c (1 lb 2.75 oz) all purpose
flour
2 t (.2 oz) gluten
2 t salt (.5 oz)
1/2 t diastatic malt powder or brown sugar
1 c (8 oz) cold water
Poolish
In the bowl of an electric mixer add flour, water and
yeast. Using the paddle attachment, mix on medium speed 2 minutes.
Cover and ferment 4 hours.
Final Dough
1.
To the poolish add the remaining ingredients. Knead 5 minutes then
test touch the dough. It should feel (1)tacky. Adjust the
(2)flour or (3)water as necessary. Knead another 5 minutes and test
the dough using a (4)window pane test. Knead an additional 3-5 minutes
if it tears easily. Remove dough and form into a ball. Spray
bowl with cooking spray. Place the dough top side down in the bowl,
then turn right side up so it is all lightly coated with cooking spray.
Cover and rise 3 hours.
2. Punch dough
down and reform into a ball. Respray the bowl and lightly coat the
dough with cooking spray again. Cover and rise 2 hours.
3. Place a french bread pan on a sheet pan.
Gently remove dough from bowl and place on a work surface. Handle it carefully so the air pockets won't get pushed out. Divide the dough in half. They should weigh 1 lb 4 oz each. Lengthwise, fold the bottom third up and the top third down overlapping the bottom third. Using your thumbs press the new bottom fold down sealing it with the rest of the dough. Wrap the ends in and seal them to the bottom as well. Roll the dough so the seam is on the bottom and gently rock the dough back and forth starting from the middle stretching it to the desired length. Pinch the seam while doing this to have a tight and even skin. If there are large air pockets that rise to the surface gently
(5)pop them. Place dough on french bread pan. There is no need
to flour or spray the pan. There should be 2 or so inches of space on
both ends of the pan. Repeat the above process with the second piece. Cover the cookie sheet with two plastic grocery bags.
(6)Refrigerate overnight.
4. Remove from the refrigerator 1 hour prior
to baking. Keep it covered. (7)30 minutes prior to baking,
position one oven rack to the second highest setting and place a (8)baking
stone on it. Position another rack to the lowest setting and place a
(9)steam pan on it. Heat to 500 degrees. 15 minutes prior to
baking remove the plastic bags. Place 2 c hot water next to the oven.
Gently touch the dough to see if it is (10)ready.
5.
With a serrated knife or bread lame gently score the top of each loaf 2-3
times. Immediately place french bread pan onto the hot stone in the
oven. Pour the 2 c hot water into the steam pan. Close the oven
and set a (11)timer for three minutes. After the 3 minutes lower oven
heat to 450. Bake another 12 minutes. Turn the pan 180 degrees
and bake another (12)10 minutes. The loaves should be a deep golden
brown. Bake an additional 3-5 minutes if it can handle it. You
can also turn the oven off and let it sit 10 minutes on the stone, if it
doesn't look ready.
6. Remove from oven and
from french bread pan. Place on a cooling rack. The bread will
continue to bake while it sits. Wait two hours before slicing and
serving the bread. If you cut into it before it cools it will become gummy
and the taste won't be quite right. Eat the bread the same day it is
baked. If you don't you can freeze it. You can slice and freeze or freeze an
entire loaf. Don't refrigerate, it tastes funny and loses it's great
texture.
Storing and Freezing
Storing - This bread is best eaten the day it's made. After it cools store in a paper sack for the day.
Freezing
Wrap the bread tightly in plastic wrap to freeze. You can slice and freeze it or freeze an uncut loaf.
Thawing slices - Leave covered and let sit at room temperature a few hours until thawed all the way through. If an enitre loaf is sliced and frozen you can crisp the crust in the oven at 350 for 10 minutes as long as the interior isn't exposed.
Quick thawing slices - Place slices of bread in the microwave for 15 seconds. Turn and microwave another 15 seconds or until thawed.
Thawing a whole loaf -
Leave covered and let sit at room temperature a few hours until thawed all the way through. Heat oven to 350 and crisp crust for 10 minutes. Let cool 10-20 minutes and slice.
Quick thawing a whole loaf - Place loaf in microwave for one minute. Turn and microwave an additional minute. Heat oven to 350 and crisp crust for 10 minutes. Let cool 10-20 minutes and slice.
Notes
1.
Tacky is the point just past sticky. It should not stick to
your fingers but just barely.
2. The flour and water proportions are critical
for this bread to turn out correctly.
Too little flour - If there is not enough flour, the bread will not be able to hold it's shape. It will bake a litle flat, or may deflate completely and be very flat. It will also be a little gummy and sticky.
Too much flour - Too much flour of course makes a dry loaf of bread. If you're going to err in this recipe, err on the side of too much flour. The loaves will still look good and taste better than a flat sticky loaf.
3. Adding water may take some kneading by hand until it's incorporated or it may splash out of the bowl. It's always eaiser to add more flour than it is to add more water.
4. Stretch the dough betweeen
your fingers, if it tears before a thin window is formed the gluten is not developed. If it stretches to form a thin window, it is ready.
5. If air pockets rise to the surface while forming the loaves, gently pop them. If you don't they can get very large during the refrigeration and when you tranfer them, they may pop and deflate the dough completely. If it doesn't pop it still may ruin the loaf by expanding in the oven leaving the loaf with huge air pockets just under the crust.
6. Refrigerating this dough for at least 8 hours is necessary to the structure of both the crust and interior of the bread. See problems for more information on this.
7. It will take most ovens 20-30 minutes before it can reach 500 degrees. It will register much sooner than this, but it often isn't ready. When my oven first registers at 500 it is actually at 300. Ten to twenty minutes later it will actually be at 500. If you put the bread in when the temperature is really at 300, it will ruin the loaves. The color, structure, and crust will be off. An oven thermometer is very helpful for this.
8. A baking or pizza stone is necessary for
this bread to turn out properly. A stone provides even heat
throughout the loaf. This prevents it from burning the bottom and
cooking the top unevenly.
9. I use a jellyroll pan for a steam pan. It does warp it, but that's all I use it for. I like the large hot surface area it gives the water. It produces a lot of steam very quickly and the rest slowly througout the baking period.
10. When the dough is ready, it should
feel very soft to the touch, but not easy to deflate. Don't let it
rise so much that it will deflate when scored. After making this a
few times you'll get used to how it should feel.
11. I don't know how many times I haven't turned the timer on for the three minutes thinking I would remember. Before I know it they have been baking at 500 for 10 minutes. I have ruined several loaves this way.
12. Breads should be baked as long as they can be without burning. It makes the crust crisper and the inside drier as opposed to gummy.
|